
Reviving Elegance: Your Ultimate Guide to Understanding, Caring for and Restoring Historic Windows
Whether you live in an old house, or you are considering buying one, historic windows can be a complete mystery! They sure were to me before we started this business.
So how do we de-mystify all of this?
Let's identify the main components of all windows, and then lay out the common issues..

Most windows are “double hung” meaning they have a top sash and a bottom sash. These are the moving parts, usually attached by sash cord to a counterweight, which enables the windows to move up and down with little resistance. There are two weights for each sash, one on each side, and they are supposed to have a combined weight equal to the weight of the sash. When the sash is functioning properly, it should be perfectly balanced for easy maneuvering up and down.
Within each sash, there are very few parts. For both the top and bottom sash there is a bottom rail (horizontal) and a top rail (horizontal), the sides are known as “stiles”. The interior of each sash may be divided into sections, the wood that does the dividing is called a muntin. Each section of glass is known as a “lite”. A common configuration is six over one, meaning there are six panes of glass in the top sash and one pane in the bottom sash.
Importantly, where the top rail of the bottom sash, and the bottom rail of the top sash meet, is called the “meeting rail” and includes the “check rail” - this is a very important junction, and where a lot can go wrong, more on that later.
The sides of the frames that hold the sash in are known as jambs. The wood in front of the sash on the inside, aligned vertically, is called the interior stop. The thin piece in the middle, between the two sash, vertical on the jamb, is called a “parting bead” or “parting stop”. Those two make sense, however, the vertical piece on the outside is called the “blind stop” - why, who knows?
The base of the window is called the sill.
What keeps the glass from falling out? When glass is placed in the “lites”, each piece is secured by small pins, and then glaze putty is applied to seal in the glass and make an angle for water to shed properly…
Now, what are the primary problems with historic windows?
Rot! This is the big one, but very often there is no rot, it is just failed glazing. The good news is that this is very easy to correct. In fact, if your glazing has failed, our work is easier, as the old glazing is easier to remove!
If there is really wood rot, the news is not all that bad. Here is where rot can occur, and why.
The sill - this is where the bottom rail of the bottom sash rests. The sill usually has a 7 degree slope away from the house, sometimes they end up flat or inverted, trapping water in a corner, where it does its work decomposing the wood. The next cause would be some form of penetration of the paint, a screwhole etc., where water collects and sits. Having any sort of device in the window really can hurt, especially older window a/c units that promote condensation. Another cause of sill rot can be old storm windows. Sometimes storm windows are installed and caulked in place so any condensation or other water that makes its way inside will just sit and do its thing!
The bottom sash meeting rail is another common spot for wood rot. If there is a vertical muntin, or a joint at the stiles (vertical side rails), water can collect in the crevices. There is an easy prevention to this which brings us to…
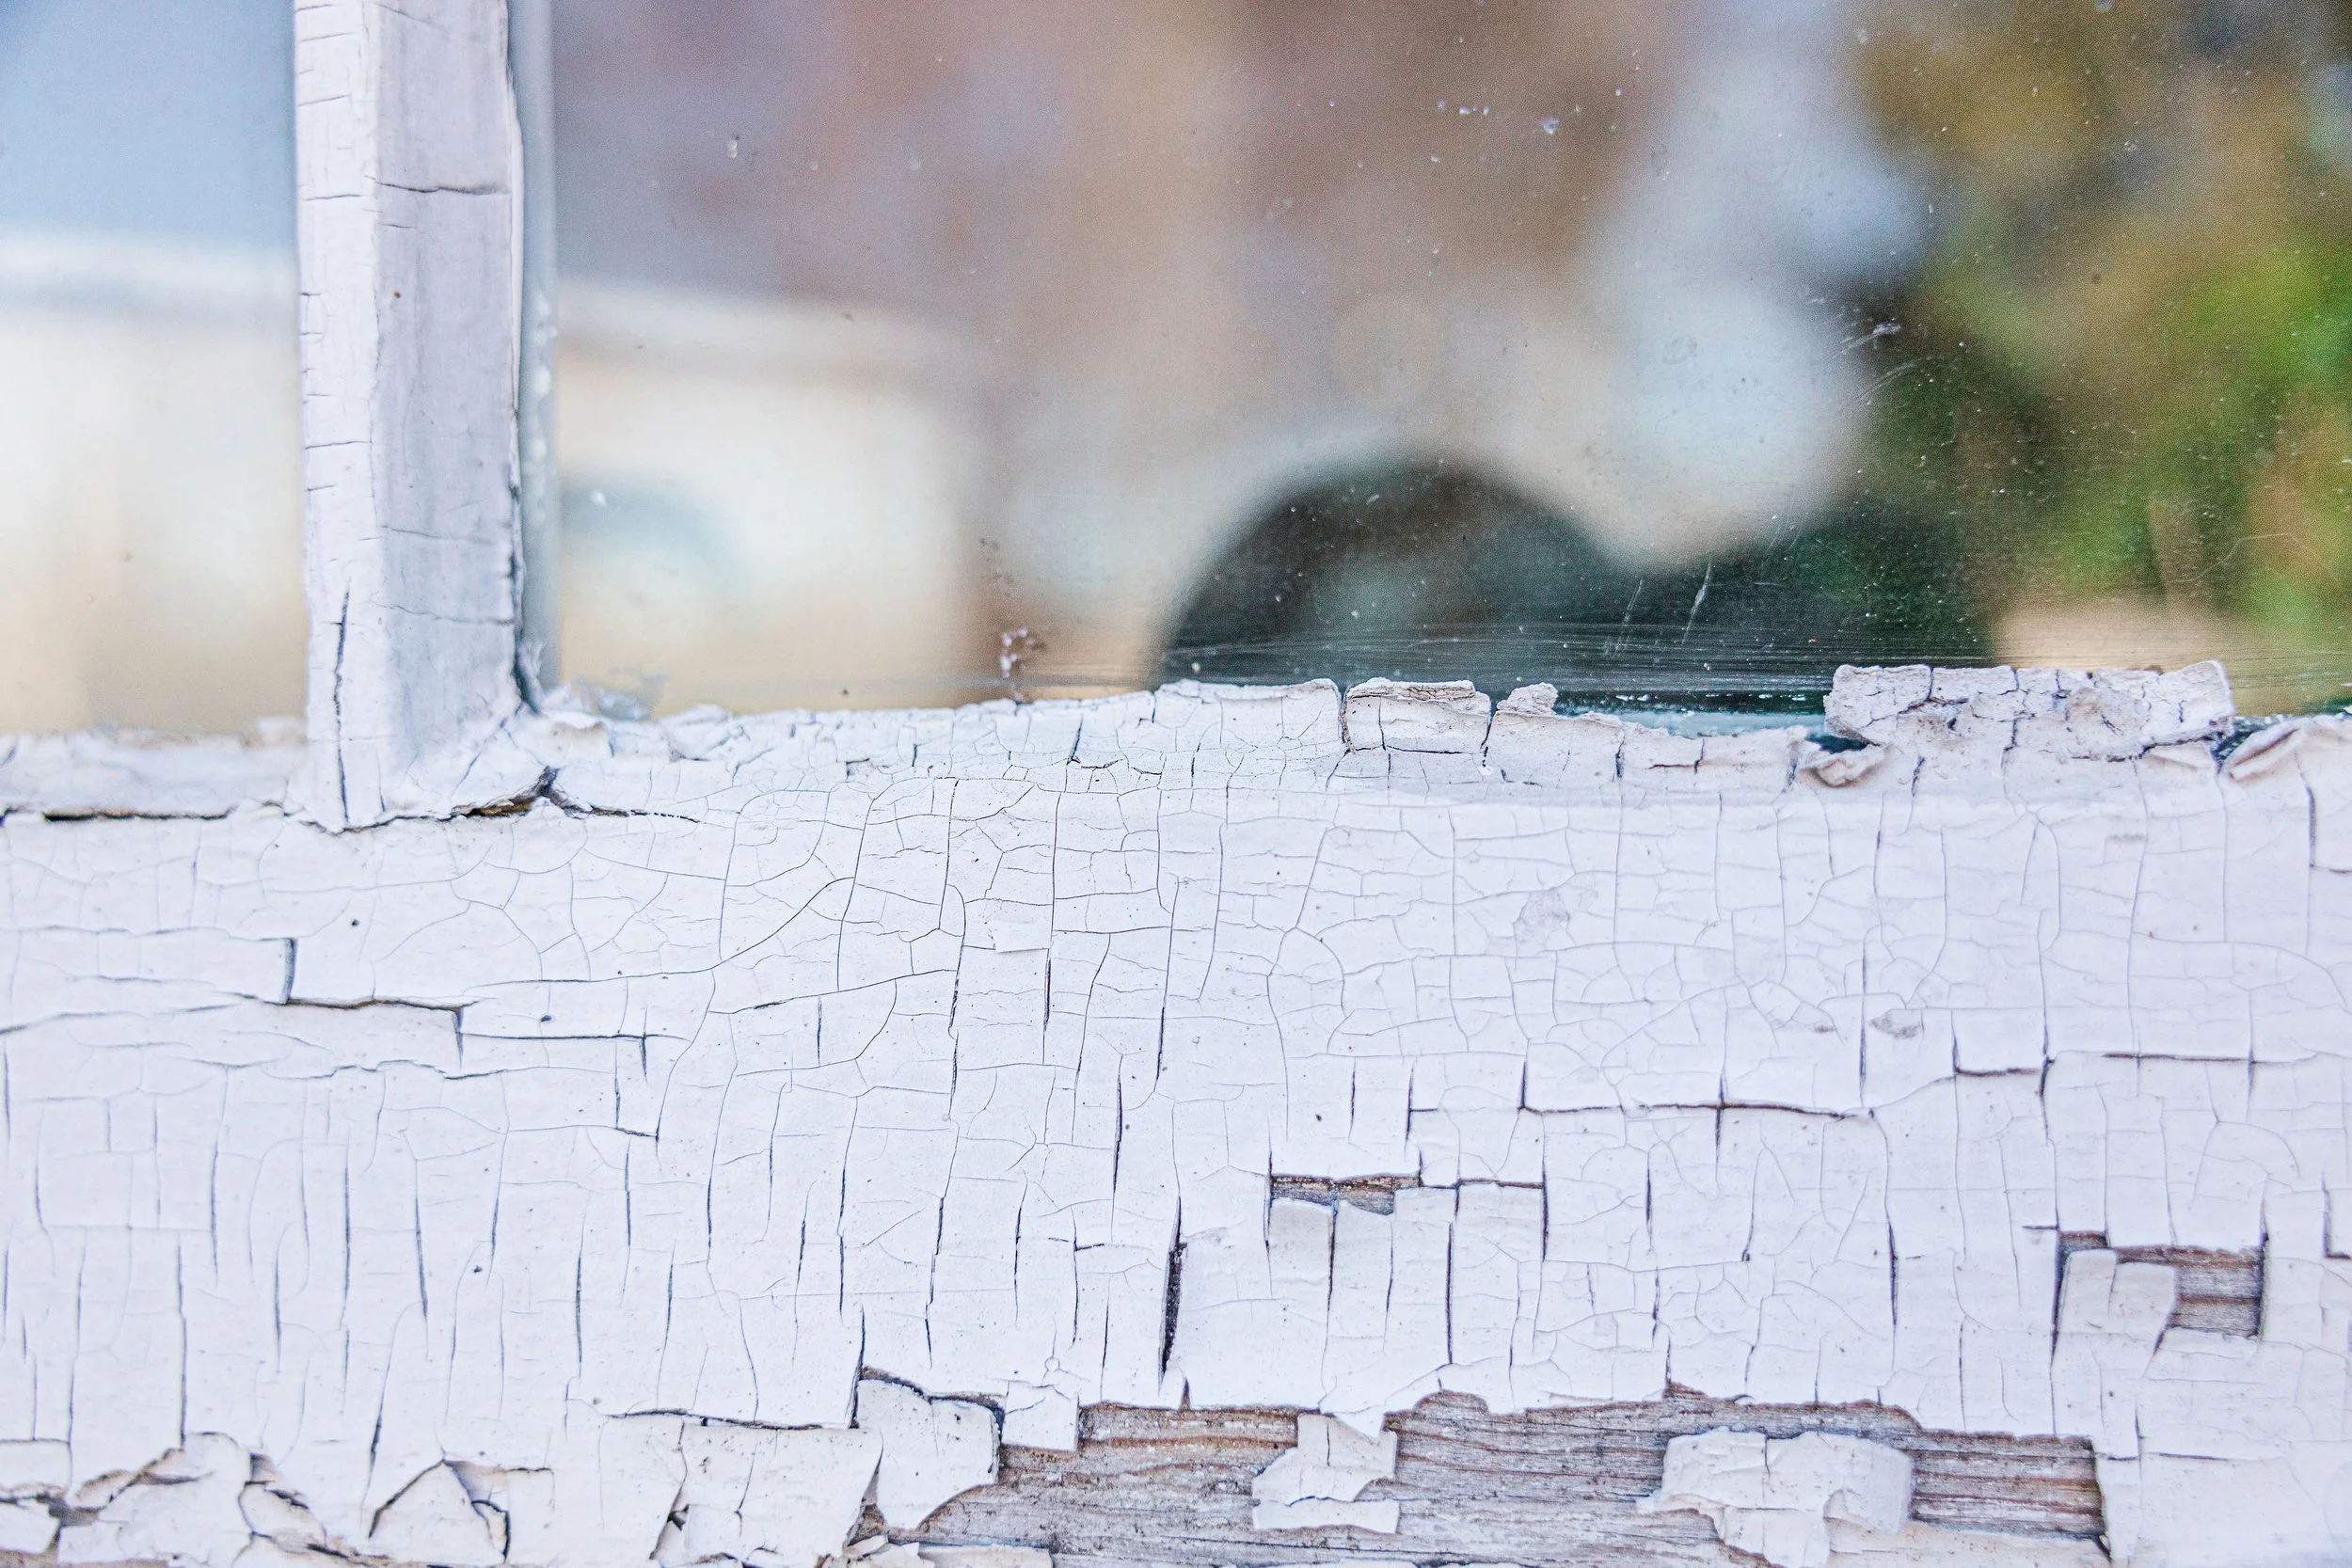
Glazing! Technically, this term refers to windows in general, but for our discussion, we will refer to glazing as a noun, where the glaze putty was applied. When done correctly, the glazing is perfectly adhered to the glass, with no gapping. Then, properly applied paint laps over the glazing onto the glass about 1/16th of an inch so water rolls right off the glass, onto the bottom rail, and then onto the properly sloped sill, then down to the ground away from the house! The smallest gap allows water to get behind the glaze and start the process of wood rotting.
Rot is not horrible to fix. Sometimes you need to replace a rail, sometimes you can use a proper epoxy, but by no means is your sash or sill headed to the dumpster!

The next issue that causes problems is the issue of misaligned sash - the meeting rail area - where the top and bottom sash come together. If this is not perfectly flat on the horizontal plane, then the “check rail”, which may or may not include interlocking weatherstripping, becomes a significant air gap that really can't be seen, but it can be a big problem! Oftentimes the top sash has sagged down and simply needs to be cut loose and moved upwards. However, in some cases, there is a need to trim the top sash (never trim the bottom unless extreme) in order to tighten this up. This is by far the most common issue we see, and is usually easy to fix. There can be dramatic thermal improvements with this small adjustment. If this alignment is not right, your sash locks won’t work.
One area that is often overlooked, but very important, is where the bottom sash check rail is notched to accommodate the parting bead/stop. There is usually a significant gap here, sometimes you can stick your pinky through it! It can be difficult to see it unless you are on a chair, but it is there more often than not. As with other areas, a quick bit of stop gap weatherstripping can easily solve this problem.
Another issue is the fact that “wood on wood” junctures are by nature inefficient. The jamb area and the sash must “seal”, same with the bottom of the bottom sash and the sill, and the meeting/check rail area. This can be significant. Your house has either positive or negative air pressure (this is why shutting one door can slam another one) so the air is fighting to get in or get out. Air cannot go through glass, so it seeks ways to move and around the sash is not a bad way for air to get through. You may have metal weatherstripping protecting these edges, some old houses do. If not, installation is not too difficult and can make a huge difference, especially if you don’t have modern storm windows. We typically recommend the use of two sash locks on wider meeting rails, just to apply extra pressure to this important surface connection.
The last topic we will cover here is bad paint. Bad paint causes a LOT of problems. Windows aren’t really “painted shut” as much as the build up of paint in the jambs does not allow them to move as they should. The paint on the edges is just the icing on the cake. We have seen OVER 1/8th of an inch of paint on jambs before making it nearly impossiblef for the sashes to move up or down. Usually on older homes, we see a base layer of lead paint (handle with care), usually oil/enamel, and then latex after that. Latex paint does NOT stick to oil-based paint so the paint gets ugly and peels. Generally, it's best to strip down to the bare wood and start over. You can sometimes get by without cosmetic upgrades, if the main issue is functionality.
In conclusion, understanding the intricacies of historic windows is key to preserving the charm and functionality of older homes. By identifying the main components and common issues associated with these windows, homeowners can take proactive measures to address potential problems. Whether it's addressing wood rot, misaligned sashes, gaps in check rails, or issues with inefficient wood-on-wood junctures, this article sheds light on practical solutions for maintaining and restoring historic windows. With proper attention to details like glazing, sash alignment, and quality paint, homeowners can not only enhance the aesthetic appeal of their homes but also ensure the longevity of these architectural treasures. Embracing the unique features of historic windows is not just a journey into the past; it's a commitment to preserving the character and authenticity that make old houses truly special.